The installation procedure of any Nextedy product consists of 2 main steps:
- Installing & updating the plugin.
- Setting up the plugin.
This article outlines the common installation process as well as the available setup options.
TABLE OF CONTENTS
Install the Nextedy product
The Nextedy widgets are standard Polarion extensions; you need to follow a standard Polarion procedure to install the extensions.
PREREQUISITE. Download the distribution from Nextedy Products:
- Select the product
- Open the Download section
- Fill in your email and download the installation package
Once you unpack the file, you will find the installation instructions included within it.
- Deploy plugin files
Unpack / Unzip the downloaded nextedy_PRODUCTNAME.zip - Copy 'com.nextedy.polarion.PRODUCTNAME' folder into 'POLARION_INSTALL_LOCATION/polarion/extension' folder.
- Apply the license
If you already have a production license, please copy the 'PRODUCTNAME_lic.json' file to '[POLARION_INSTALL]/polarion/license' - Delete '[POLARION_INSTALL]/data/workspace/.config'
and '[POLARION_INSTALL]/data/workspace/.metadata'
Make sure you perform this step also when updating the Nextedy plugins.
.config file only contains cached plugin data, and does NOT affect Polarion performance. Deleting it is recommended by Polarion support when installing and updating plugins.
.metadata doesn't hold any special data as well, and it is recommended to delete it when installing/updating the tools in order to prevent possible errors. - Restart the Polarion server
- Validate the Installation
Open Polarion Administration - you should see a new section called NEXTEDY PRODUCTNAME
This confirms that the selected plugin was successfully uploaded.
Update the Nextedy product
If you already have a Nextedy Product installed on your server and you just want to update it to the new version, please follow these steps:
PREREQUISITE. Download the distribution from Nextedy Products:
- Select the product
- Open the Download section
- Fill in your email and download the installation package
Once you unpack the file, you will find the installation instructions included within it.
- Deploy plugin files
Unpack / Unzip the downloaded nextedy_PRODUCTNAME.zip - Uninstall the current version of the product, i.e delete
`POLARION_INSTALL_LOCATION/polarion/extension/com.nextedy.polarion.PRODUCTNAME - Copy the newly downloaded 'com.nextedy.polarion.PRODUCTNAME' folder into 'POLARION_INSTALL_LOCATION/polarion/extension' folder.
- Delete '[POLARION_INSTALL]/data/workspace/.config'
and '[POLARION_INSTALL]/data/workspace/.metadata'
Make sure you perform this step also when updating the Nextedy plugins.
.config file only contains cached plugin data, and does NOT affect Polarion performance. Deleting it is recommended by Polarion support when installing and updating plugins.
.metadata doesn't hold any special data as well, and it is recommended to delete it when installing/updating the tools in order to prevent possible errors. - Restart the Polarion server
- Validate the Update
Open Polarion Administration - NEXTEDY PRODUCTNAME - Setup.
You should see that your installed version is updated to the latest one.
This confirms that the selected plugin was successfully updated.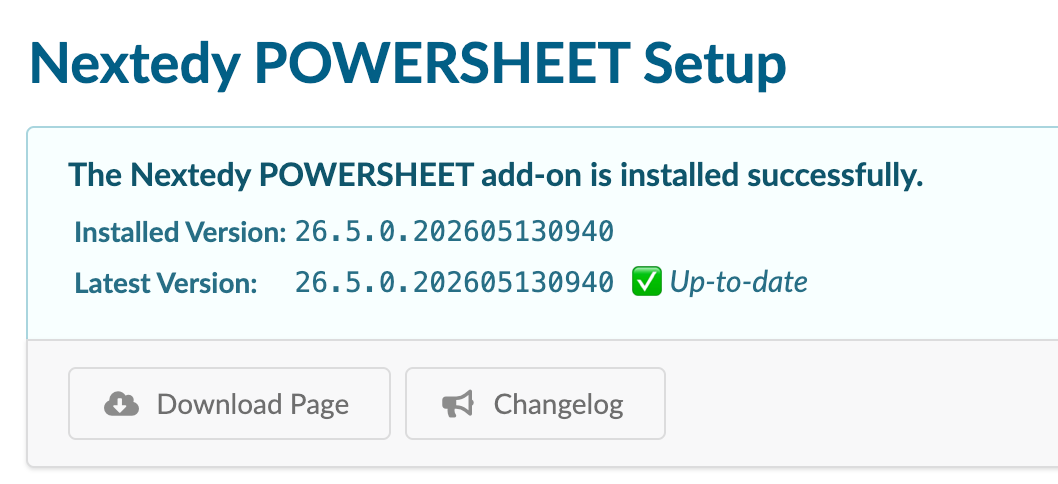
Please pay attention to perform the step 2.
Only one package per product can be located in the extension folder.
Set up the Nextedy product
To set up any Nextedy tool, you may decide to install a demo project or set up the product in an existing project.
Install and create a project from the demo project template
By completing this action, you'll be able to create new projects with the demo version of the Nextedy product in a few clicks.
First of all, it is needed to install the demo template.
To do so, follow these steps:
- Once your Polarion server is started
- Open Polarion Administration
- Navigate to Nextedy PRODUCTNAME > Setup
- Locate Demo Project Template - Install Demo Template
- Wait for the installation procedure to finish
Once the template is installed, you may create a demo project from it.
In the same location in the Polarion administration - Nextedy PRODUCTNAME - Setup:
- Start the action: Create New Project and follow the instructions under it
- Or create a new project from the Polarion interface, and follow the same instructions.
In the end, you'll have a reusable project template on your server, ready to be used when creating new projects with a demo version of the selected Nextedy product.
Set up the product in an existing project
The setup procedure of the Nextedy tool might be a bit different from product to product. The detailed instructions on how to do so are specified in our documentation, which you can see linked under:
- "Polarion Administration" - "Nextedy PRODUCTNAME - Setup - Set up Nextedy PRODUCTNAME in Existing Projects
Ultimately, you will have:
- Nextedy product installed on your system;
- Demo project completed with sample data;
- Or the Nextedy tool running in an existing project.
For any assistance, please don’t hesitate to reach out by submitting a ticket here.
Was this article helpful?
That’s Great!
Thank you for your feedback
Sorry! We couldn't be helpful
Thank you for your feedback
Feedback sent
We appreciate your effort and will try to fix the article