Planningboard cards show a lot of useful information by default, but every team plans differently. With a small amount of scripting, you can tailor each card to surface exactly the information your planners need at a glance — workload distribution, status, priority, parent grouping, or anything else stored in your work items.
This article walks through the most common customizations, from simple field tweaks to a richer per-assignee workload display. Each section explains why the customization is useful before showing the code, so you can decide which ones fit your team's workflow.
TABLE OF CONTENTS
- Where to put the script
- Adjust visible fields, layout, and colors
- Fit the title inside the card
- Color items by parent (inherit color from parent item)
- Show Per-assignee remaining workload on each card
- Available API objects and fields
Where to put the script
All examples in this article go into the Item Script field in the Advanced Properties section of the Planningboard widget. The Item Script runs once per card, every time the board is rendered or after a change (drag-and-drop, status update, etc.). Whatever you assign to the cli.* properties controls how that card looks.
A small number of customizations belong in the Config Script instead — that's a separate field used for global setup like custom CSS. The "Fit the title inside the card" section below is one such case and points this out explicitly.
You can define what appears on a card using the Item Script in the Advanced Properties section of the Planningboard widget.
Adjust visible fields, layout, and colors
The default card shows the title, ID, and a couple of standard fields. If your planners care about a specific custom field — a vendor team, an effort estimate, a SWAG, a status indicator — surfacing it directly on the card means they don't need to open the work item to make planning decisions. The same script can also color-code cards by type (e.g., parent change requests vs. regular stories) so different categories of work are visually distinguishable on the board.
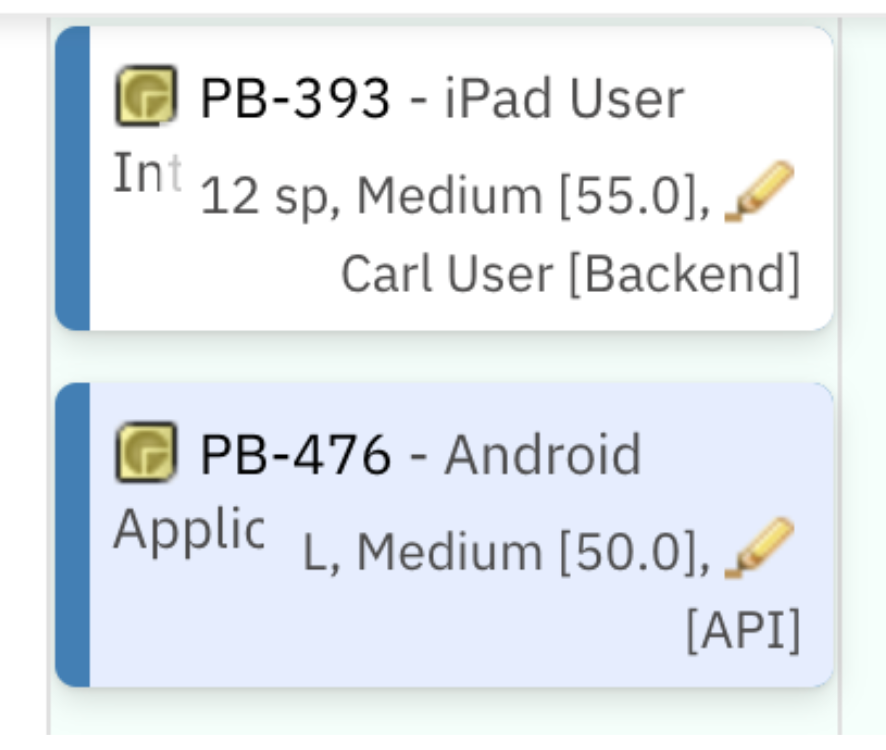
The example below shows two lines of item details under the title, with a different background color depending on the work item's crType:
var crType = wi.getValue("crType");
if (crType != null && crType.getId() === "parentCR") {
    cli.fieldsLine =
        workitem.fields().get("swagEstimate").render().htmlFor().forFrame() +
        ", " +
        workitem.fields().priority().render().withText(true).withIcon(false).htmlFor().forFrame() +
        ", " +
        workitem.fields().status().render().withText(false).htmlFor().forFrame() +
        "<br>" +
        workitem.fields().assignee().render().htmlFor().forFrame() +
        " [" +
        workitem.fields().get("vendorTeam").render().htmlFor().forFrame() +
        "]";
    cli.cardColor = "#e3edff";
} else {
    cli.fieldsLine =
        workitem.fields().get("initialStoryPoints").render().htmlFor().forFrame() +
        " sp, " +
        workitem.fields().priority().render().withText(true).withIcon(false).htmlFor().forFrame() +
        ", " +
        workitem.fields().status().render().withText(false).htmlFor().forFrame() +
        "<br>" +
        workitem.fields().assignee().render().htmlFor().forFrame() +
        " [" +
        workitem.fields().get("solutionTeam").render().htmlFor().forFrame() +
        "]";
}
The two main properties at work here:
- cli.fieldsLine controls what appears under the title. It accepts HTML, so you can mix rendered Polarion fields (which come with their proper formatting and links), plain text, line breaks, and styled spans.
- cli.cardColor sets the card's background color. Use a hex code or a named color. A subtle pastel works best — strong colors compete with the text and tire the eye over a long planning session.
Fit the title inside the card
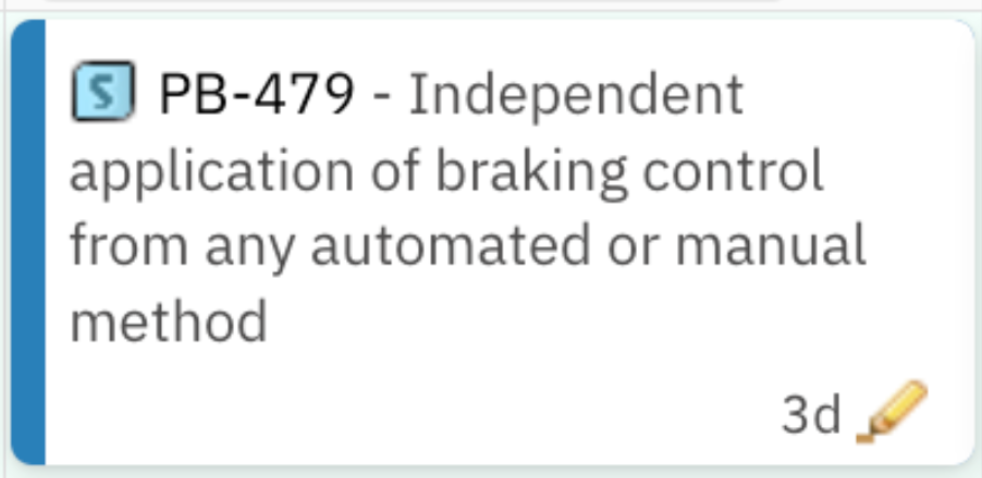
Long work item titles get truncated on cards by default, which means planners have to hover or open the item just to read what it's about. This is especially frustrating when titles only differ in their final words (e.g., "Driver Pilot — Bluetooth Pairing" vs. "Driver Pilot — Bluetooth Reconnection"). Letting titles wrap to multiple lines keeps every card legible without forcing them to grow huge.
Add this snippet to the Config Script in the same Advanced Properties section:
var style = document.createElement('style');
style.innerHTML = ".eventitem .title { height: 87px; }";
document.head.appendChild(style);
The title height should be slightly smaller than the overall card height so there's room for whatever's in fieldsLine underneath. If you set them too close, the title will spill into the field area or get clipped at the bottom.
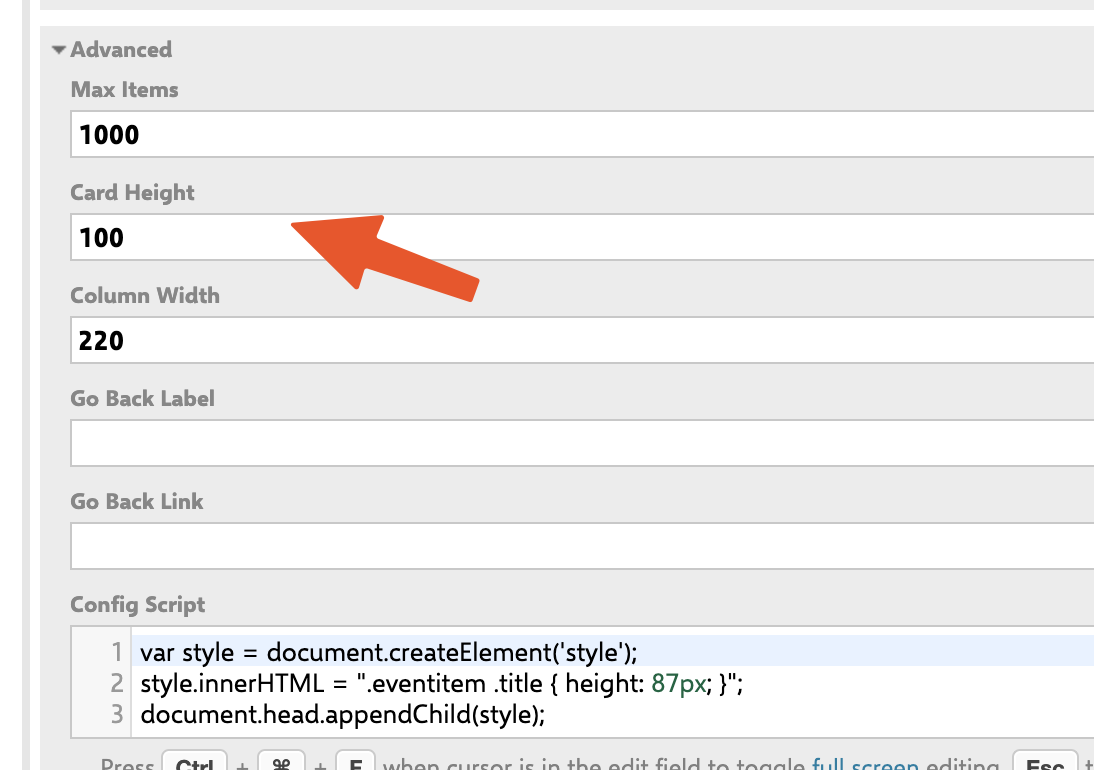
To find the right value for your board, right-click any card and choose Inspect in your browser. The Elements tab lets you adjust the height live and preview how it looks before committing to a number. The CSS rule you write in the Config Script will override Polarion's default once the page reloads.

Color items by parent (inherit color from parent item)
When work is organized into a parent–child hierarchy (system requirements broken down into tasks, epics broken into stories, change requests broken into work packages), planners often want to see the parent grouping at a glance. Without this, a column with 30 cards from 6 different parents looks like a sea of identical-looking items. Assigning each parent a color and propagating it to all its children turns the same column into clearly grouped clusters — you can immediately see how much of the column belongs to each initiative.
This customization works best when each child has exactly one parent in the hierarchy.

Each parent item (such as System Requirement in our example) defines its own color in a custom field. All child items linked to it will inherit that color automatically.
Step 1 — Add a pbColor custom field to the parent type
On your parent work item type (System Requirement, Epic, or whatever applies in your project), add a custom field named pbColor of type String.

Step 2 — Populate the field on each parent
For each parent item, fill in pbColor with a color name. The example script supports blue, red, green, and yellow, but you can extend the list (see notes below).

Step 3 — Add the script to your Item Script configuration
cli.readonly = false;

var i = wi.getLinkedWorkItemsStructsDirect().iterator();
var parent = null;
while (i.hasNext()) {
    var link = i.next();
    if (link.getLinkRole() && link.getLinkRole().getId() === "implements") {
        parent = link.getLinkedItem();
    }
}

if (parent != null) {
    var pbColor = parent.getValue("pbColor");
    if (pbColor && pbColor.trim() !== "") {
        pbColor = pbColor.toLowerCase().trim();
        if (pbColor === "blue") cli.cardColor = "#00c3ff";
        else if (pbColor === "red") cli.cardColor = "#ff4d4d";
        else if (pbColor === "green") cli.cardColor = "#00f57f";
        else if (pbColor === "yellow") cli.cardColor = "#ffd700";
    }
}
A few notes for adapting this to your own project:
- The script looks for an implements link role to find the parent. If your project uses a different role (parent, decomposed_by, has_parent), replace "implements" with the role ID you actually use.
- You can expand the color list freely — add more else if branches, or accept hex codes directly so users can write #FF8800 in the pbColor field instead of choosing from a fixed vocabulary.
- If a child has multiple parents (rare but possible), the script will only pick up whichever parent it encounters last in the link iteration. For accurate coloring in that case, you'd need a rule for which parent wins.
Show Per-assignee remaining workload on each card
During a planning session, the most expensive question to answer is "who is overloaded?" Normally a planner would have to open every work package, look at its child tasks, check who's assigned to each, and add up the hours mentally. Doing this for thirty cards in a column is tedious and error-prone — and any drag-and-drop change immediately invalidates the mental model.
This customization solves the problem inline by showing remaining hours per assignee directly on each card, derived from the card's child tasks.
Two versions are available depending on how much visual detail your team needs:
- The simple version shows a clean plain-text list — easy to read, minimal setup, works well for any card size.
- The advanced version adds color-coded pills, per-pill tooltips with task breakdowns, and richer warning states — more visual information density for teams that do intensive planning sessions.
Both versions share the same core logic:
- The parent link role is read from config.parentRole (set by the Planningboard widget), so neither script needs hardcoded role IDs and both work in any project without modification.
- If a task has multiple assignees, its effort is split equally among them.
- If the same person appears on multiple tasks, their hours are summed into a single entry.
- Tasks with zero remaining effort are classified as completed (had an initial estimate) or unestimated (no initial estimate), and handled differently in the warning states.
- If the work package has no children, both scripts fall back to using the work package itself.
Warning and empty states
Both versions handle situations where there is nothing meaningful to show. Rather than displaying an empty card, they show a neutral grey informational message so planners know exactly why the card looks different.
| Situation | Message shown |
| config.parentRole not set on the Planningboard | Planningboard misconfigured — parentRole not set |
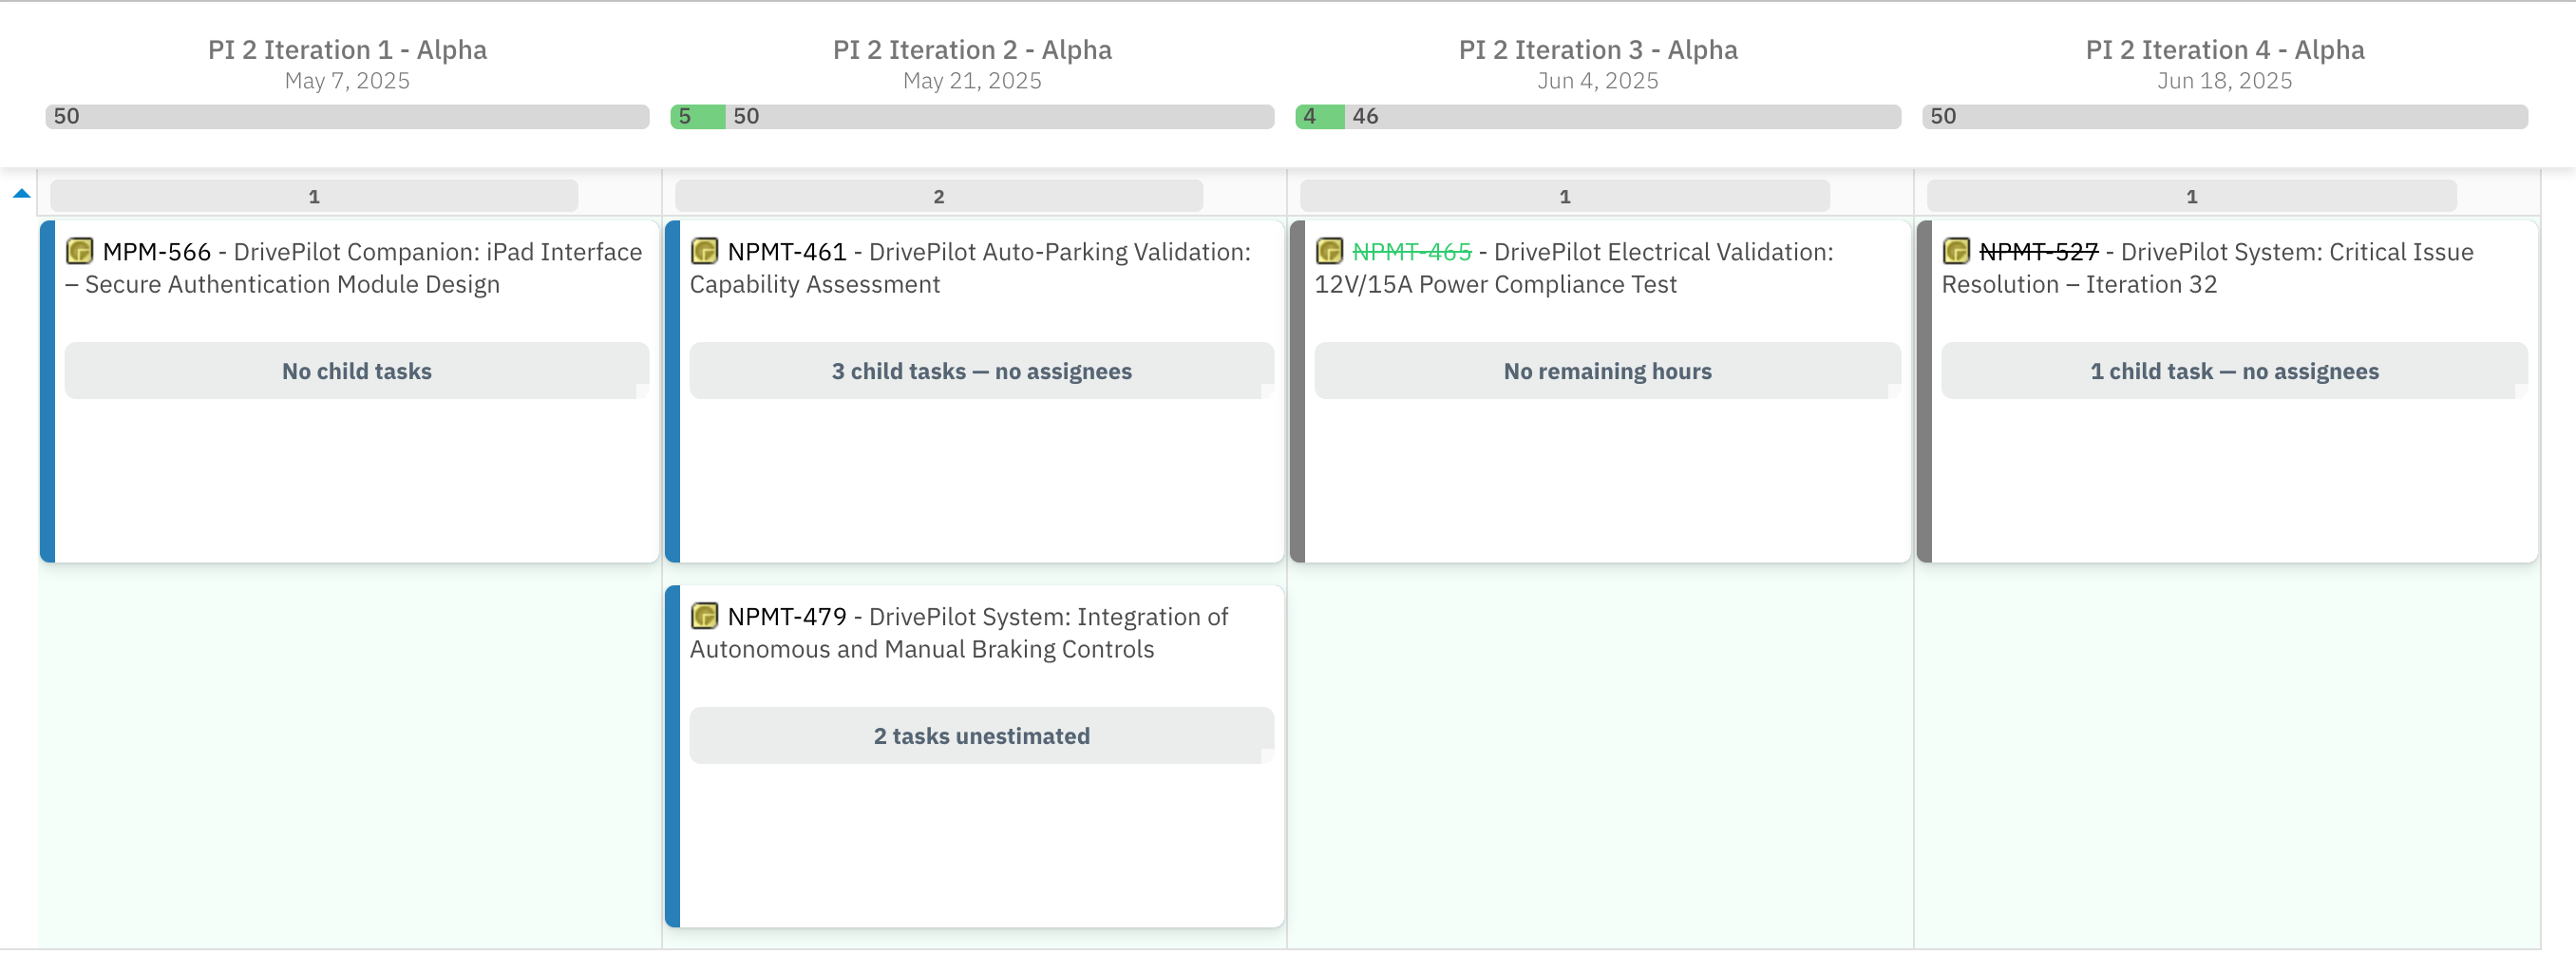
| The work package has no child tasks at all | No child tasks |
| All child tasks are done (had estimates, fully burned down) | No remaining hours |
| All child tasks exist but none have an initial estimate set | N tasks unestimated |
| Mix of done and unestimated tasks, no active work | No remaining hours (N unestimated) |
| Child tasks have remaining work but no one is assigned | N child tasks — no assignees |
When the main list does show, two additional warning chips can appear above the list if relevant:
- Unassigned tasks — one or more child tasks have remaining effort but no assignee. These hours aren't attributed to anyone. The chip shows the count and total unattributed hours: 1 unassigned task (8h).
- Unestimated tasks — one or more child tasks have no initial estimate set and can't contribute meaningful effort numbers. The chip shows the count: 2 unestimated tasks.
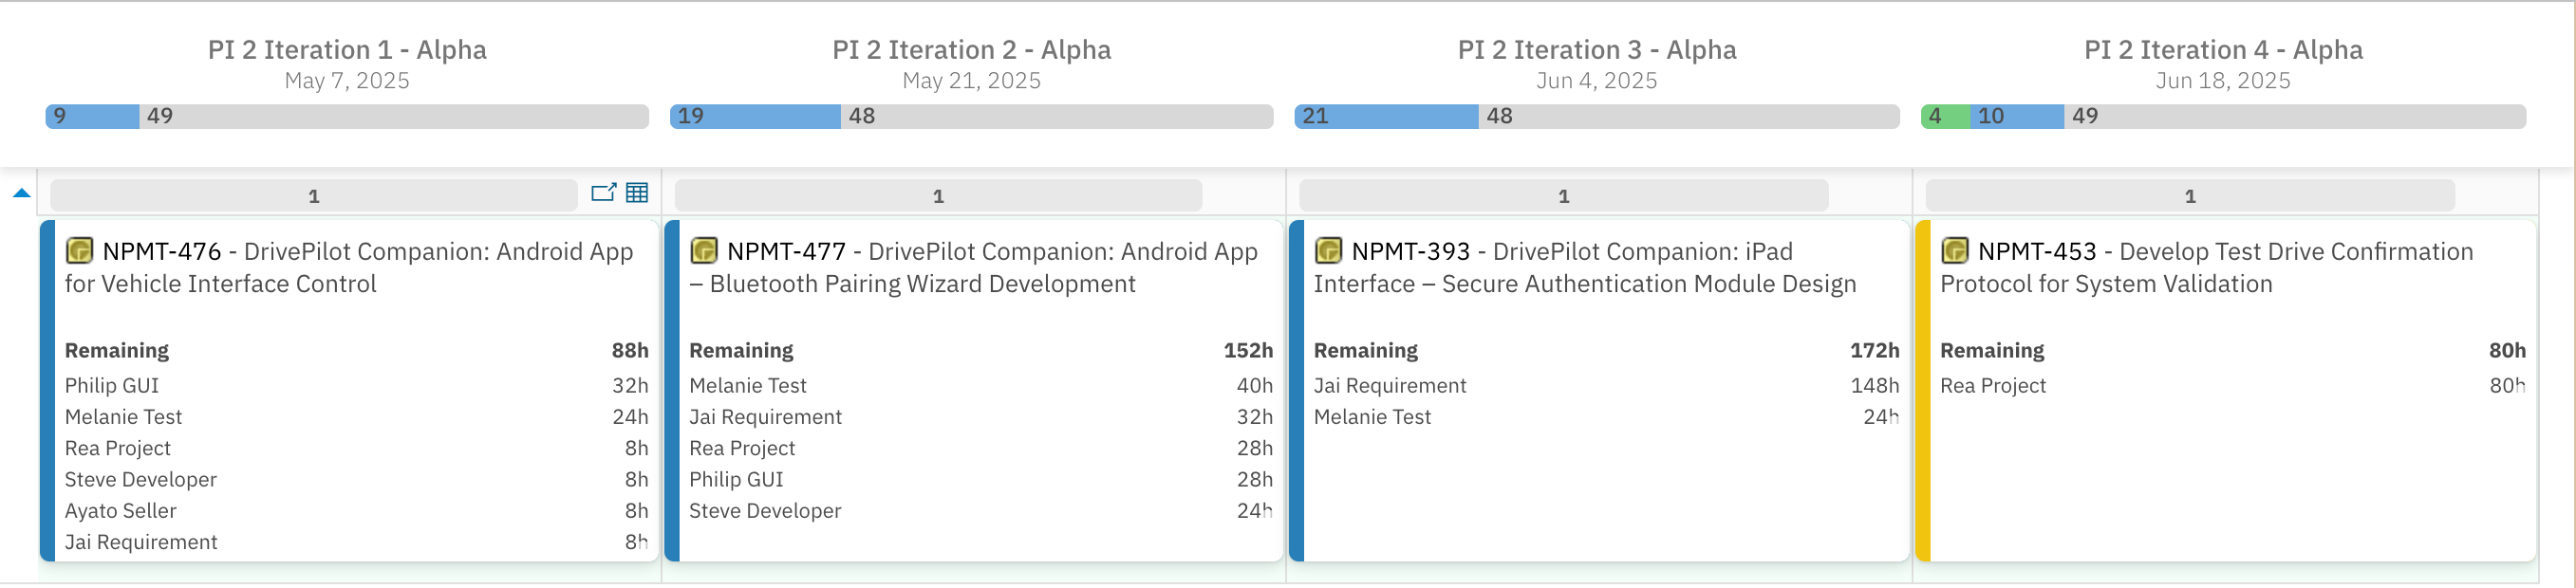
Simple version — plain text list
Each card shows a bold header with the total remaining hours, followed by one line per assignee with their hours right-aligned:
function fmt(h) { var r = Math.round(h * 10) / 10; return r === Math.floor(r) ? Math.floor(r) : r; }
function esc(s) { return String(s).replace(/'/g, "'"); }
function plural(n, w) { return n + " " + (n == 1 ? w : w + "s"); }

function banner(msg) {
    return "<div style='background:#EAEDED;color:#566573;border-radius:6px;" +
        "padding:6px 10px;margin-top:4px;font-size:12px;font-weight:bold;text-align:center'>" +
        msg + "</div>";
}
function chip(msg) {
    return "<div style='background:#EAEDED;color:#566573;border-radius:4px;" +
        "padding:3px 7px;margin-top:3px;font-size:11px;font-weight:bold'>" +
        msg + "</div>";
}

var parentRole = config.parentRole;
if (!parentRole) {
    cli.fieldsLine = banner("Planningboard misconfigured — parentRole not set");
} else {

    var children = new java.util.ArrayList();
    var backs = wi.getLinkedWorkItemsStructsBack();
    for (var i = 0; i < backs.size(); i++) {
        var role = backs.get(i).getLinkRole();
        if (role && role.getId() == parentRole) {
            var c = backs.get(i).getLinkedItem();
            if (c && !c.isUnresolvable()) children.add(c);
        }
    }
    var items = children.isEmpty() ? java.util.Collections.singletonList(wi) : children;

    var userMap = new java.util.LinkedHashMap();
    var totalHours = 0, taskCount = 0;
    var unassigned = 0, unassignedHours = 0;
    var withEffort = 0, completed = 0, unestimated = 0;

    for (var i = 0; i < items.size(); i++) {
        var t = items.get(i);
        var effort = service.getItemEffortHours(t, config);

        if (!effort) {
            var hasEst = false;
            try {
                if (typeof t.getInitialEstimate == "function") {
                    var e = t.getInitialEstimate();
                    hasEst = (e != null && e != "");
                }
            } catch (e) { /* ignore */ }
            if (hasEst) completed++; else unestimated++;
            continue;
        }
        withEffort++;

        var assignees = t.getAssignees(), n = assignees.size();
        taskCount++;
        if (n == 0) { unassigned++; unassignedHours += effort; continue; }

        totalHours += effort;
        var share = effort / n;

        for (var j = 0; j < n; j++) {
            var a = assignees.get(j), uid = a.getId();
            var entry = userMap.get(uid);
            if (!entry) {
                entry = { id: uid, name: a.isUnresolvable() ? uid : a.getName(), hours: 0 };
                userMap.put(uid, entry);
            }
            entry.hours += share;
        }
    }

    var users = [], it = userMap.entrySet().iterator();
    while (it.hasNext()) users.push(it.next().getValue());
    users.sort(function (a, b) { return b.hours - a.hours; });

    if (users.length === 0) {
        if (children.isEmpty()) {
            cli.fieldsLine = banner("No child tasks");
        } else if (unestimated > 0 && completed === 0 && unassigned === 0) {
            cli.fieldsLine = banner(plural(unestimated, "task") + " unestimated");
        } else if (withEffort === 0 && unestimated === 0 && unassigned === 0) {
            cli.fieldsLine = banner("No remaining hours");
        } else if (withEffort === 0 && unestimated > 0) {
            cli.fieldsLine = banner("No remaining hours (" + unestimated + " unestimated)");
        } else {
            cli.fieldsLine = banner(plural(unassigned, "child task") + " — no assignees");
        }
    } else {
        var lines = "";
        for (var i = 0; i < users.length; i++) {
            var u = users[i];
            lines +=
                "<div style='display:flex;justify-content:space-between'>" +
                    "<span>" + esc(u.name) + "</span>" +
                    "<span>" + fmt(u.hours) + "h</span>" +
                "</div>";
        }

        var warnings = "";
        if (unassigned > 0) warnings += chip(plural(unassigned, "unassigned task") + " (" + fmt(unassignedHours) + "h)");
        if (unestimated > 0) warnings += chip(plural(unestimated, "unestimated task"));

        cli.fieldsLine =
            "<div style='line-height:1.5;font-size:11px'>" +
                "<div style='display:flex;justify-content:space-between;font-weight:bold;margin-bottom:2px'>" +
                    "<span>Remaining</span>" +
                    "<span>" + fmt(totalHours) + "h</span>" +
                "</div>" +
                warnings +
                lines +
            "</div>";
    }
}
Advanced version — color-coded pills
Each card shows the same information as the simple version, but assignees are displayed as colored pills in a two-column grid. Each person has a stable color derived from their user ID, so the same person appears in the same color across all cards on the board — making it easy to visually track a specific person's workload without reading every name. Hovering an individual pill shows the specific tasks contributing to that person's total.
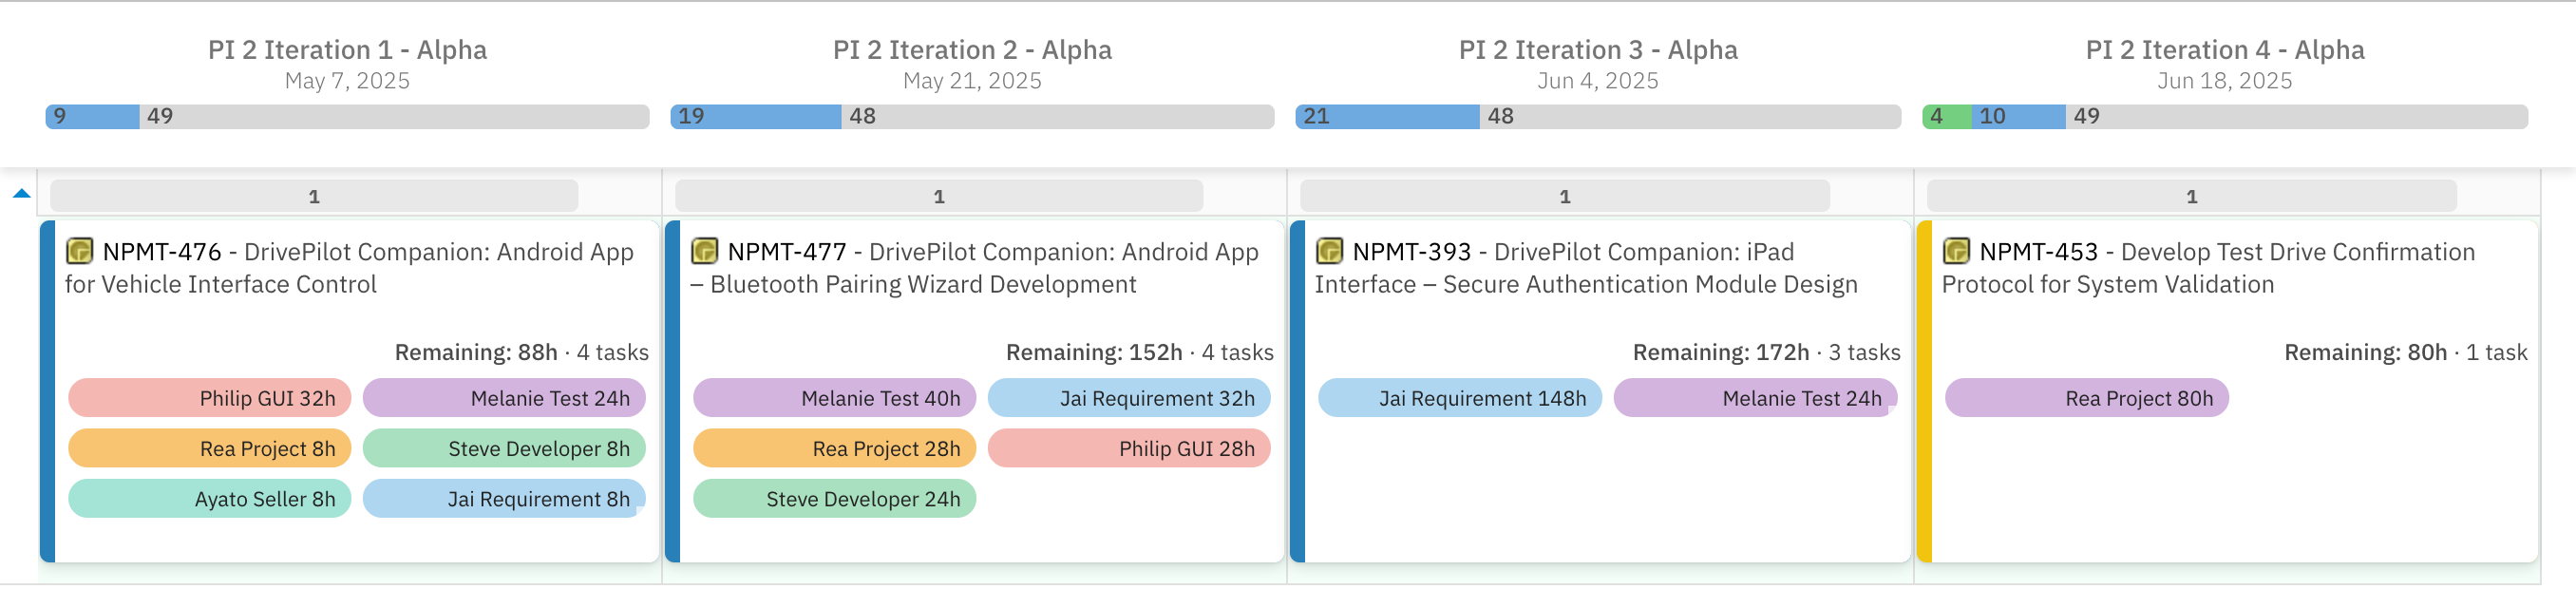
Color assignment uses a 12-color palette. Each user is hashed to a preferred color, and if two users on the same card would share a color, the second walks forward through the palette until a free slot is found — guaranteeing no two pills on a single card ever look alike.
var COLORS = [
    "#AED6F1", "#F5B7B1", "#A9DFBF", "#F9E79F",
    "#D2B4DE", "#F8C471", "#85C1E9", "#E59866",
    "#82E0AA", "#BB8FCE", "#A3E4D7", "#F7DC6F"
];

function fmt(h) { var r = Math.round(h * 10) / 10; return r === Math.floor(r) ? Math.floor(r) : r; }
function esc(s) { return String(s).replace(/'/g, "'"); }
function colorIdx(id) {
    var h = 2166136261;
    for (var i = 0; i < id.length; i++) { h ^= id.charCodeAt(i); h = (h * 16777619) | 0; }
    return (h < 0 ? -h : h) % COLORS.length;
}
function plural(n, w) { return n + " " + (n == 1 ? w : w + "s"); }
function banner(msg) {
    return "<div style='background:#EAEDED;color:#566573;border-radius:6px;" +
        "padding:6px 10px;margin-top:4px;font-size:12px;font-weight:bold;text-align:center'>" +
        msg + "</div>";
}
function chip(msg) {
    return "<div style='background:#EAEDED;color:#566573;border-radius:4px;" +
        "padding:3px 7px;margin-top:3px;font-size:11px;font-weight:bold'>" +
        msg + "</div>";
}

var parentRole = config.parentRole;
if (!parentRole) {
    cli.fieldsLine = banner("Planningboard misconfigured — parentRole not set");
} else {

    var children = new java.util.ArrayList();
    var backs = wi.getLinkedWorkItemsStructsBack();
    for (var i = 0; i < backs.size(); i++) {
        var role = backs.get(i).getLinkRole();
        if (role && role.getId() == parentRole) {
            var c = backs.get(i).getLinkedItem();
            if (c && !c.isUnresolvable()) children.add(c);
        }
    }
    var items = children.isEmpty() ? java.util.Collections.singletonList(wi) : children;

    var userMap = new java.util.LinkedHashMap();
    var totalHours = 0, taskCount = 0;
    var unassigned = 0, unassignedHours = 0;
    var withEffort = 0, completed = 0, unestimated = 0;

    for (var i = 0; i < items.size(); i++) {
        var t = items.get(i);
        var effort = service.getItemEffortHours(t, config);

        if (!effort) {
            var hasEst = false;
            try {
                if (typeof t.getInitialEstimate == "function") {
                    var e = t.getInitialEstimate();
                    hasEst = (e != null && e != "");
                }
            } catch (e) { /* ignore */ }
            if (hasEst) completed++; else unestimated++;
            continue;
        }
        withEffort++;

        var assignees = t.getAssignees(), n = assignees.size();
        taskCount++;
        if (n == 0) { unassigned++; unassignedHours += effort; continue; }

        totalHours += effort;
        var share = effort / n;
        var taskInfo = { id: t.getId(), title: t.getTitle ? t.getTitle() : "", share: share };

        for (var j = 0; j < n; j++) {
            var a = assignees.get(j), uid = a.getId();
            var entry = userMap.get(uid);
            if (!entry) {
                entry = { id: uid, name: a.isUnresolvable() ? uid : a.getName(), hours: 0, tasks: [] };
                userMap.put(uid, entry);
            }
            entry.hours += share;
            entry.tasks.push(taskInfo);
        }
    }

    var users = [], it = userMap.entrySet().iterator();
    while (it.hasNext()) users.push(it.next().getValue());

    var colorOrdered = users.slice().sort(function (a, b) {
        return a.id < b.id ? -1 : a.id > b.id ? 1 : 0;
    });
    var used = {};
    for (var i = 0; i < colorOrdered.length; i++) {
        var p = colorIdx(colorOrdered[i].id), step = 0;
        while (used[p] && step < COLORS.length) {
            p = (p + 1) % COLORS.length;
            step++;
        }
        used[p] = true;
        colorOrdered[i].color = COLORS[p];
    }

    users.sort(function (a, b) { return b.hours - a.hours; });

    if (users.length === 0) {
        if (children.isEmpty()) {
            cli.fieldsLine = banner("No child tasks");
        } else if (unestimated > 0 && completed === 0 && unassigned === 0) {
            cli.fieldsLine = banner(plural(unestimated, "task") + " unestimated");
        } else if (withEffort === 0 && unestimated === 0 && unassigned === 0) {
            cli.fieldsLine = banner("No remaining hours");
        } else if (withEffort === 0 && unestimated > 0) {
            cli.fieldsLine = banner("No remaining hours (" + unestimated + " unestimated)");
        } else {
            cli.fieldsLine = banner(plural(unassigned, "child task") + " — no assignees");
        }
    } else {
        // Each pill tooltip lists that user's specific tasks with IDs and hours
        var pills = "", blockTip = "";
        for (var i = 0; i < users.length; i++) {
            var u = users[i], tip = u.name + " — " + fmt(u.hours) + "h";
            for (var j = 0; j < u.tasks.length; j++) {
                var tk = u.tasks[j];
                tip += "\n  " + tk.id + (tk.title ? " " + tk.title : "") + " (" + fmt(tk.share) + "h)";
            }
            blockTip += (blockTip ? "\n" : "") + tip;
            pills +=
                "<span title='" + esc(tip) + "' style='display:inline-block;background:" + u.color + ";" +
                "color:#222;border-radius:10px;padding:2px 8px;margin:2px;font-size:11px;" +
                "white-space:nowrap;overflow:hidden;text-overflow:ellipsis;cursor:default'>" +
                u.name + " " + fmt(u.hours) + "h</span>";
        }

        var warnings = "";
        if (unassigned > 0) warnings += chip(plural(unassigned, "unassigned task") + " (" + fmt(unassignedHours) + "h)");
        if (unestimated > 0) warnings += chip(plural(unestimated, "unestimated task"));

        cli.fieldsLine =
            "<div title='" + esc(blockTip) + "' style='line-height:1.5'>" +
                "<div><b>Remaining: " + fmt(totalHours) + "h</b> · " + plural(taskCount, "task") + "</div>" +
                warnings +
                "<div style='display:grid;grid-template-columns:1fr 1fr;gap:2px;margin-top:3px'>" + pills + "</div>" +
            "</div>";
    }
}
Choosing between the two versions
| Simple | Advanced | |
| Layout | Plain text, left/right aligned | Color-coded pills, 2-column grid |
| Per-task detail | Not shown | Visible on hover (tooltip) |
| User color consistency | No colors | Same color per user across all cards |
| Card space needed | Less — works on narrow cards | More — pills need horizontal room |
| Maintenance | Minimal | Slightly more (palette can be adjusted) |
Both versions share identical logic for aggregation, sorting, warning states, and empty states. The only difference is the rendering step.
Available API objects and fields
You can use the following objects and properties inside your Planningboard scripts. These are the standard scripting APIs available for customizing card appearance and behavior.
Main objects
| Object | Description |
wi | The current Work Item using the classic Polarion API (IWorkItem) |
workitem | The same item through the rendering API, used for accessing field rendering helpers (workitem.fields(), etc.) |
cli | The client-side configuration of the card — controls what's displayed, how it looks, and whether it's editable |
| service | The Planningboard data service. Exposes helpers like service.getItemEffortHours(item, config) for reading remaining work hours |
| config | The widget configuration. Includes config.parentRole (the link role identifying parent/child), among other settings |
cli properties (client-side data)
| Property | Type | Description |
text | String | General text content; can be used for additional display info |
color | String | Frame (border) color value |
cardColor | String | Background color of the card (hex or named color) |
readonly | Boolean | When true, prevents card configuration changes from your script. Set to false if you need to modify card attributes |
resolved | Boolean | Whether the item is resolved — useful for visual cues |
effort | Float | Numeric effort value if available; can be rendered or used in calculations |
label | String | Optional short text label displayed on the card |
fieldsLine | String | The text (HTML) displayed under the card title. Can include multiple rendered fields, plain text, line breaks, and styled spans |
| tooltip | String | Text shown when hovering over the card. Supports HTML |
See also:
For any assistance, please don’t hesitate to reach out by submitting a ticket here.
Was this article helpful?
That’s Great!
Thank you for your feedback
Sorry! We couldn't be helpful
Thank you for your feedback
Feedback sent
We appreciate your effort and will try to fix the article